Your single point of reference for all your Geotechnical Inquiries
PIL-7 Point Load Tester
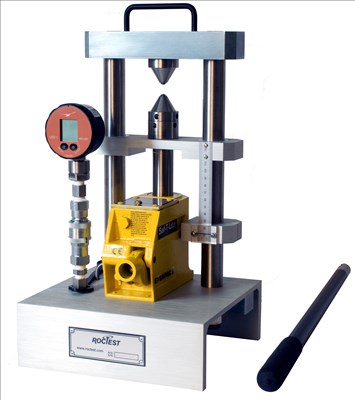
The PIL-7 point load tester consists of a loading frame, a mounted hydraulic ram and a pressure gauge for maximum load indication. An upper conical platen is fixed on the frame and a lower one on the jack piston. A graduated scale is fixed on the frame and indicates the specimen diameter.
Test Procedure
Three point load test configurations are used depending on the available rock specimens: Diametrical – Axial – Irregular lumpThe diametrical and axial tests use core specimens with length/diameter (L/D) ratios greater than 1.0 in the first case, and between 0.3 and 1.0 in the second case. Rock pieces of suitable irregular shapes are used when cores are not available. The testing steps are the same for all configurations:
- The specimen is positioned between the conical platens. The platens are then closed to make contact.
- The distance “De” between the points of contact is read on the scale.
- The load is increased such that failure occurs within 10 to 60 sec. and the failure load “P” is read and recorded.
Interpretation
The Point Load Tester allows the user to determine an “Uncorrected Point Load Strength Index” (Is). This index must be corrected to a standard equivalent diameter (De) of 50 mm. It then becomes a unique property of the rock tested (Is(50)) which is most useful in rock strength classification.Rock anisotropy is quantified by the “Strength Anisotropy Index” Ia(50). This index is the ratio of the greatest to least Is(50) index measured respectively perpendicular and parallel to the existing planes of weakness.The uniaxial tensile (UTS) and compressive (UCS) strengths can be approximated from the Is(50) index. The UTS is about 1.25 times Is(50) and the UCS is normally between 20 and 25 times the Is(50) index.
Is is obtained from the following equation:
- Is = P / De2
- where: Is: Uncorrected Point Load Strength Index, in MPa or psi
- P: Failure load, in MN or lbf (maximum pressure × jack piston area)
- De: Equivalent core diameter, in meters or inches (De = D for diametral tests)
- The ISRM* “Suggested Method for Determining Point Load Strength” size correction procedure is used. Is(50) is obtained either graphically, mathematically or by testing 50 mm (maximum diameter) specimens.
- *ISRM: International Society of Rock Mechanics.
Roctest Ltd.
680 Birch Street
Saint-Lambert, Quebec
Canada J4P 2N3
Tel: +1 450 465 1113
Toll free: 1 877 762 8378
Fax: +1 450 465 1938
Canada


